Cloud Formation Template Examples

1. Simple Cloud Formation template to create EC2 instance.

---
AWSTemplateFormatVersion: "2010-09-09"
Description: "This template will create an EC2 instance with default tenancy, with specific AMI, Availability zone, Subnet, KeyPair and instance type "
 
Resources:
  DEVEC2Instance:
    Type: AWS::EC2::Instance
    Properties:
      AvailabilityZone: ap-south-1a
      ImageId: ami-0732b62d310b80e97
      InstanceType: t2.micro
      KeyName: MumbaiKP
      SubnetId: subnet-03a896945c3e5eb15
      Tags:
        Key: "Name"
          Value: "CFInstance"
      Tenancy: default

2. A Cloud Formation template to create EC2 instance with EIP.

---
AWSTemplateFormatVersion: "2010-09-09"
Description: "This template will create an EC2 instance with default tenancy, with specific AMI, Availability zone, Subnet, KeyPair and Instance type and EIP"
 
Resources:
  MyEC2Instance:
    Type: AWS::EC2::Instance
    Properties:
      ImageId: ami-0732b62d310b80e97
      InstanceType: t2.micro
      KeyName: MumbaiKP
      SecurityGroups:
        - default
      Tags:
        - Key: "Name"
          Value: "CFInstance"
      Tenancy: default
 
  MyElasticIP:                  
    Type: AWS::EC2::EIP
    Properties:
      InstanceId: !Ref MyEC2Instance

3. A Cloud Formation template to create EC2 instance with EIP and Security Group.

---
AWSTemplateFormatVersion: "2010-09-09"
Description: "This template will create an EC2 instance with default tenancy, with specific AMI, Availability zone, Subnet, KeyPair, and Instance type and EIP"
 
Resources:
  MyEC2Instance:
    Type: AWS::EC2::Instance
    Properties:
      ImageId: ami-0732b62d310b80e97
      InstanceType: t2.micro
      KeyName: MumbaiKP
      SecurityGroups:
        - !Ref SSHSecurityGroup
      Tags:
        - Key: "Name"
          Value: "CFInstance"
      Tenancy: default
     
  SSHSecurityGroup:
    Type: AWS::EC2::SecurityGroup
    Properties:
      GroupDescription: My SSH SG to allow 22 port
      SecurityGroupIngress:
        - IpProtocol: tcp
          FromPort: '22'
          ToPort: '22'
          CidrIp: 0.0.0.0/0
 
  MyElasticIP:                 
    Type: AWS::EC2::EIP
    Properties:
      InstanceId: !Ref MyEC2Instance

4. A Cloud Formation template to create EC2 instance with Security Group and allows you to select AZ, Instance Type, and Key Pair.

---
AWSTemplateFormatVersion: "2010-09-09"
 
Description: "This template allows you to select AvailabilityZone, InstanceType, and KeyPair to create EC2 instance with SecurityGroup allowing 22 port"
 
Parameters:
  MyKeyName:
    Description: Select the Kay Name from the List
    Type: AWS::EC2::KeyPair::KeyName
         
  MyAvailabilityZone:
    Description: Select the AZ from the List
    Type: String
    Default: ap-south-1a
    AllowedValues:
      - ap-south-1a
      - ap-south-1b
      - ap-south-1c
           
  MyInstanceType:
    Description: Select the AZ from the List
    Type: String
    Default: t2.micro
    AllowedValues:
      - "t2.nano"
      - "t2.micro"
      - "t2.small"
      - "t2.medium"
      - "t2.large"
 
Resources:
  MyEC2Instance:
    Type: AWS::EC2::Instance
    Properties:
      ImageId: ami-0732b62d310b80e97
      InstanceType: !Ref MyInstanceType
      KeyName: !Ref MyKeyName
      SecurityGroups:
        - !Ref SSHSecurityGroup
      Tags:
        - Key: "Name"
          Value: "CFInstance"
      Tenancy: default
      AvailabilityZone: !Ref MyAvailabilityZone
 
  SSHSecurityGroup:
    Type: AWS::EC2::SecurityGroup
    Properties:
      GroupDescription: "My SSH SG to allow 22 port"
      SecurityGroupIngress:
        - IpProtocol: tcp
          FromPort: '22'
          ToPort: '22'
          CidrIp: 0.0.0.0/0

5. A Cloud Formation template to create EC2 instance with Dev, Test, Prod environment with respective instance type.

 ---
AWSTemplateFormatVersion: "2010-09-09"
Description: "This template allows you to select an environmnent like dev, test, prod based on which EC2 instance of respective instance type will be launched with AZ, KeyPair, existing SecurityGroup inside selected subnet."
 
Parameters:
  MyKeyName:
    Description: Select the key name from the list
    Type: AWS::EC2::KeyPair::KeyName
 
  MyEnvironment:
    Description: Select Your Environment
    Type: String
    Default: Dev
    AllowedValues:
      - Dev
      - Test
      - Prod
 
  MyAvailabilityZone:
    Description: Select the Availability Zone from the List
    Type: String
    Default: ap-south-1a
    AllowedValues:
      - ap-south-1a
      - ap-south-1b
      - ap-south-1c
 
  MySecurityGroups:
    Description: The list of SecurityGroupIds in your Virtual Private Cloud (VPC)
    Type: List<AWS::EC2::SecurityGroup::Id>      
 
  MySubnetId:
    Description: Select Subnet from the List.
    Type: AWS::EC2::Subnet::Id
 
Mappings:
  MyRegionMap:
    ap-south-1:
      AMI1: ami-0732b62d310b80e97   
 
  MyEnvironmentMap:
    Dev:
      instanceType: t2.micro
    Test:
      instanceType: t2.small       
    Prod:
      instanceType: t2.medium
 
Resources:
  MyEC2Instance:
    Type: AWS::EC2::Instance
    Properties:
      AvailabilityZone: !Ref MyAvailabilityZone
      ImageId: !FindInMap
        - MyRegionMap
        - !Ref 'AWS::Region'
        - AMI1         
      InstanceType: !FindInMap
        - MyEnvironmentMap
        - !Ref MyEnvironment
        - instanceType                
      KeyName: !Ref MyKeyName
      SecurityGroupIds: !Ref MySecurityGroups
      SubnetId: !Ref MySubnetId
      Tags:
        - Key: "Name"
          Value: "CFInstance"
      Tenancy: default

6. A Cloud Formation template to create VPC with public and private subnets, Internet Gateway, Nat Gateway, Route Tables.

---
AWSTemplateFormatVersion: '2010-09-09'
Description: 'This template will create VPC with two public and private subnets spread across two AZ, creates Internet gateway, Nat Gateway, Route Tables and also associate these subnets with respective route tables, Also adds route entries to route tables for traffic destined to the Internet.' 
Parameters:
  EnvironmentName:
    Description: An environment name that is prefixed to resource names
    Type: String
 
  VpcCIDR:
    Description: Please enter the IP range (CIDR notation) for this VPC
    Type: String
    Default: 10.192.0.0/16
   
  PublicSubnet1CIDR:
    Description: Please enter the IP range (CIDR notation) for Public Subnet 1
    Type: String
    Default: 10.192.1.0/24
 
  PublicSubnet2CIDR:
    Description: Please enter the IP range (CIDR notation) for Public Subnet 2
    Type: String
    Default: 10.192.2.0/24
 
  PrivateSubnet1CIDR:
    Description: Please enter the IP range (CIDR notation) for Private Subnet 1
    Type: String
    Default: 10.192.11.0/24
 
  PrivateSubnet2CIDR:
    Description: Please enter the IP range (CIDR notation) for Private Subnet 2
    Type: String
    Default: 10.192.12.0/24   
 
Resources:
##### Create VPC #####
  MyVPC:
    Type: AWS::EC2::VPC
    Properties:
      CidrBlock: !Ref VpcCIDR
      EnableDnsHostnames: true
      EnableDnsSupport: true
      InstanceTenancy: default
      Tags:
        - Key: Name
          Value: !Sub ${EnvironmentName}-VPC
 
##### Create Internet Gateway and Attach to VPC #####                
 
  MyInternetGateway:
    Type: AWS::EC2::InternetGateway
    Properties:
      Tags:
        - Key: Name
          Value: !Sub ${EnvironmentName}-IGW
 
  AttachMyInternetGateway:
    Type: AWS::EC2::VPCGatewayAttachment
    Properties:
      VpcId: !Ref MyVPC
      InternetGatewayId: !Ref MyInternetGateway
 
##### Create Nat Gateway in Public Subnet #####
##### Allocate Elastic IP to Nat Gateway #####
 
  NatEIP:
    DependsOn: AttachMyInternetGateway
    Type: AWS::EC2::EIP
    Properties:
       Domain: vpc
 
  MyNATGateway:
    Type: AWS::EC2::NatGateway
    DependsOn: AttachMyInternetGateway
    Properties:
       AllocationId: !GetAtt NatEIP.AllocationId
       SubnetId: !Ref PublicSubnet1
       Tags:
         - Key: Name
           Value: !Sub ${EnvironmentName}-NGW
 
##### Create Public and Private Subnets #####   
 
  PublicSubnet1:
    Type: AWS::EC2::Subnet
    Properties:
      AvailabilityZone: !Select [ 0, !GetAZs ]
      CidrBlock: !Ref PublicSubnet1CIDR
      MapPublicIpOnLaunch: true
      Tags:
       - Key: Name
         Value: !Sub ${EnvironmentName}-Public-A
      VpcId: !Ref MyVPC
 
  PublicSubnet2:
    Type: AWS::EC2::Subnet
    Properties:
      AvailabilityZone: !Select [ 1, !GetAZs ]
      CidrBlock: !Ref PublicSubnet2CIDR
      MapPublicIpOnLaunch: true
      Tags:
       - Key: Name
         Value: !Sub ${EnvironmentName}-Public-B
      VpcId: !Ref MyVPC
 
  PrivateSubnet1:
    Type: AWS::EC2::Subnet
    Properties:
      AvailabilityZone: !Select [ 0, !GetAZs ]
      CidrBlock: !Ref PrivateSubnet1CIDR
      MapPublicIpOnLaunch: false
      Tags:
       - Key: Name
         Value: !Sub ${EnvironmentName}-Private-A
      VpcId: !Ref MyVPC
 
  PrivateSubnet2:
    Type: AWS::EC2::Subnet
    Properties:
      AvailabilityZone: !Select [ 1, !GetAZs ]
      CidrBlock: !Ref PrivateSubnet2CIDR
      MapPublicIpOnLaunch: false
      Tags:
       - Key: Name
         Value: !Sub ${EnvironmentName}-Private-B
      VpcId: !Ref MyVPC
 
##### Create Public Route Table and add Route to InternetGateway #####
 
  PublicRouteTable:
    Type: AWS::EC2::RouteTable
    Properties:
      VpcId: !Ref MyVPC
      Tags:
      - Key: Name
        Value: !Sub ${EnvironmentName}-PublicRT
 
  MyPublicRoute:
    Type: AWS::EC2::Route
    DependsOn: AttachMyInternetGateway
    Properties:
       RouteTableId: !Ref PublicRouteTable
       DestinationCidrBlock: 0.0.0.0/0
       GatewayId: !Ref MyInternetGateway
 
##### Create Private Route Table add Route to NATGateway #####
 
  PrivateRouteTable:
    Type: AWS::EC2::RouteTable
    Properties:
      VpcId: !Ref MyVPC
      Tags:
      - Key: Name
        Value: !Sub ${EnvironmentName}-PrivateRT
 
  MyPrivateRoute:
    Type: AWS::EC2::Route
    Properties:
       RouteTableId: !Ref PrivateRouteTable
       DestinationCidrBlock: 0.0.0.0/0
       NatGatewayId: !Ref MyNATGateway
 
##### Associate Public RT and Private RT with subnets #####
 
  PublicSubnet1RouteTableAssociation:
    Type: AWS::EC2::SubnetRouteTableAssociation
    Properties:
      SubnetId: !Ref PublicSubnet1
      RouteTableId: !Ref PublicRouteTable
 
  PublicSubnet2RouteTableAssociation:
    Type: AWS::EC2::SubnetRouteTableAssociation
    Properties:
      SubnetId: !Ref PublicSubnet2
      RouteTableId: !Ref PublicRouteTable
 
  PrivateSubnet1RouteTableAssociation:
    Type: AWS::EC2::SubnetRouteTableAssociation
    Properties:
      SubnetId: !Ref PrivateSubnet1
      RouteTableId: !Ref PrivateRouteTable
 
  PrivateSubnet2RouteTableAssociation:
    Type: AWS::EC2::SubnetRouteTableAssociation
    Properties:
      SubnetId: !Ref PrivateSubnet2
      RouteTableId: !Ref PrivateRouteTable
 
Outputs:
  VPC:
    Description: A reference to the created VPC
    Value: !Ref MyVPC
 
  PublicSubnets:
    Description: A list of the public subnets
    Value: !Join [ ",", [ !Ref PublicSubnet1, !Ref PublicSubnet2 ]]
 
  PrivateSubnets:
    Description: A list of the private subnets
    Value: !Join [ ",", [ !Ref PrivateSubnet1, !Ref PrivateSubnet2 ]]
 
  PublicSubnet1:
    Description: A reference to the public subnet in the 1st Availability Zone
    Value: !Ref PublicSubnet1
 
  PublicSubnet2:
    Description: A reference to the public subnet in the 2nd Availability Zone
    Value: !Ref PublicSubnet2
 
  PrivateSubnet1:
    Description: A reference to the private subnet in the 1st Availability Zone
    Value: !Ref PrivateSubnet1
 
  PrivateSubnet2:
    Description: A reference to the private subnet in the 2nd Availability Zone
    Value: !Ref PrivateSubnet2

7. A Cloud Formation template to create EC2 Instance with Apache web server installed using CloudFormation bootstrap scripts.

--- 
AWSTemplateFormatVersion: 2010-09-09
Description: "AWS CloudFormation Sample Template for Apache Web Server This template demonstrates using the AWS CloudFormation bootstrap scripts to install the packages and files necessary to deploy the Apache web server at instance launch time."
Parameters:
  MyKeyName:
    Description: Select The Key Name From The List.
    Type: 'AWS::EC2::KeyPair::KeyName'
  MyInstanceType:
    Description: WebServer EC2 instance type
    Type: String
    Default: t2.micro
    AllowedValues:
      - t2.nano
      - t2.micro
      - t2.small
      - t2.medium
      - t2.large
  MyAvailabilityZone:
    Description: Select the Availability Zone from the List
    Type: String
    Default: ap-south-1a
    AllowedValues:
      - ap-south-1a
      - ap-south-1b
      - ap-south-1c
  MySecurityGroups:
    Description: The list of SecurityGroupIds in your Virtual Private Cloud (VPC)
    Type: 'List<AWS::EC2::SecurityGroup::Id>'
  MySubnetId:
    Description: Select Subnet From The List.
    Type: 'AWS::EC2::Subnet::Id'
Resources:
  MyEC2Instance:
    Type: 'AWS::EC2::Instance'
    Metadata:
      Comment: Install httpd package
      'AWS::CloudFormation::Init':
        config:
          packages:
            yum:
              httpd: []
          files:
            /var/www/html/index.html:
              content: |
                <html>
                  <body>
                    <h1>Goinit.Net</h1>
                    <h2>CloudFormation Web Server</h2>
                    <p>Welcome to My page.</p>
                  </body>
                </html>
              mode: '000644'
              owner: root
              group: root
            /etc/cfn/cfn-hup.conf:
              content: !Sub |
                stack=$(AWS::StackId}
                region=${AWS::Region}
                interval=7
              mode: '000400'
              owner: root
              group: root
            /etc/cfn/hooks.d/cfn-auto-reloader.conf:
              content: !Sub |
                [cfn-auto-reloader-hook]
                triggers=post.update
                path=Resources.MyEC2Instance.Metadata.AWS::CloudFormation::Init
                action=/opt/aws/bin/cfn-init -v --stack ${AWS::StackName} --resource MyEC2Instance --region ${AWS::Region}
              mode: '000400'
              owner: root
              group: root
          services:
            sysvinit:
              httpd:
                enabled: 'true'
                ensureRunning: 'true'
              cfn-hup:
                enabled: 'true'
                ensureRunning: 'true'
                files:
                  - /etc/cfn/cfn-hup.conf
                  - /etc/cfn/hooks.d/cfn-auto-reloader.conf   
    Properties:
      AvailabilityZone: !Ref MyAvailabilityZone
      ImageId: ami-0732b62d310b80e97
      InstanceType: !Ref MyInstanceType
      KeyName: !Ref MyKeyName
      SecurityGroupIds: !Ref MySecurityGroups
      SubnetId: !Ref MySubnetId
      Tags:
        - Key: Name
          Value: CFInstance
      Tenancy: default
      UserData:
        Fn::Base64:
          !Sub |
            #!/bin/bash -xe
            #Get latest cfn package
            yum update -y aws-cfn-bootstrap
            #Start cfn-init to install all metadata content
            /opt/aws/bin/cfn-init --stack ${AWS::StackName} --resource MyEC2Instance --region ${AWS::Region} || error_exit 'Failed to run cfn-init'
            #Signal the status from cfn-init
            /opt/aws/bin/cfn-signal -e $? --stack ${AWS::StackName} --resource MyEC2Instance --region ${AWS::Region}
Outputs:
  MyInstanceURL:
    Description: Apache web URL
    Value: !Sub 'http://${MyEC2Instance.PublicDnsName}'

8. A Cloud Formation template to create EC2 Instance with S3 Read Only Access by using EC2 IAM Role.
---
AWSTemplateFormatVersion: "2010-09-09"
Description: "AWS Cloud Formation template to create EC2 Instance with S3 Read Only Access(List* and Get*) by using EC2 IAM Role "
 
Parameters:
  InstanceName:
    Description: Give Tag to Instance
    Type: String
    Default: WebServer
 
  MyKeyName:
    Description: "Select The Key Name From The List."
    Type: AWS::EC2::KeyPair::KeyName
 
  MyInstanceType:
    Description: "WebServer EC2 instance type"
    Type: String
    Default: "t2.micro"
    AllowedValues:
      - "t2.nano"
      - "t2.micro"
      - "t2.small"
      - "t2.medium"
      - "t2.large"
 
  MyAvailabilityZone:
    Description: Select the Availability Zone from the List
    Type: String
    Default: ap-south-1a
    AllowedValues:
      - ap-south-1a
      - ap-south-1b
      - ap-south-1c
 
  MySecurityGroups:
    Description: The list of SecurityGroupIds in your Virtual Private Cloud (VPC)
    Type: List<AWS::EC2::SecurityGroup::Id>      
 
  MySubnetId:
    Description: Select Subnet From The List.
    Type: AWS::EC2::Subnet::Id
 
Resources:
  MyEC2Instance:
    Type: AWS::EC2::Instance
    Properties:
      AvailabilityZone: !Ref MyAvailabilityZone
      ImageId: ami-0e306788ff2473ccb
      InstanceType: !Ref MyInstanceType
      KeyName: !Ref MyKeyName
      SecurityGroupIds: !Ref MySecurityGroups
      SubnetId: !Ref MySubnetId
      Tags:
        - Key: "Name"
          Value: !Ref InstanceName
      Tenancy: default
      IamInstanceProfile: !Ref MyInstanceS3AccessProfile
 
  MyEc2S3AccessProfileRole:
    Type: 'AWS::IAM::Role'
    Properties:
      AssumeRolePolicyDocument:
        Version: 2012-10-17
        Statement:
          - Effect: Allow
            Principal:
              Service:
              - ec2.amazonaws.com
            Action:
              - 'sts:AssumeRole'
      Path: /
      Policies:
        - PolicyName: MyEc2InstanceS3AccessPolicy
          PolicyDocument:
            Version: 2012-10-17
            Statement:
              - Effect: Allow
                Action:
                  - 's3:Get*'
                  - 's3:List*'
                Resource: '*'
 
  MyInstanceS3AccessProfile:
    Type: 'AWS::IAM::InstanceProfile'
    Properties:
      Path: /
      Roles:
        - !Ref MyEc2S3AccessProfileRole  
 
Outputs:
  MyInstanceId:
    Description: Public IP Address
    Value: !GetAtt MyEC2Instance.PublicIp

How to create custom network with specific subnet and IP range

Task:

Create a custom network with default bridge driver named as my-custom-net with subnet 10.100.0.0/16 gateway 10.100.0.1 and IP range 10.100.2.0/24.
Create a container named as net-test with custom network i.e my-custom-net.
Inspect the container net-test and check the IP address assigned to it.

1. Create a custom network with custom IP settings.

#docker network create --subnet 10.100.0.0/16 --gateway 10.100.0.1 --ip-range 10.100.2.0/24 --driver bridge --label host2net my-custom-net                             

2. Inspect the custom network.

#docker network inspect my-custom-net                                                           

Check the Subnet, Gateway, IP Range and Label assigned to the network.


3. Launch the container with the custom network.  

#docker run -itd --name test1 --net my-custom-net centos:centos7 bash             

4. check container IP with docker inspect command.

#docker container inspect test1| grep -w "IPAddress"                                         

How to Access Docker container from another container by name

Task:

Create custom network with default bridge driver named as my-custom-net.
Create two container named as web1 and test1 with custom network i.e my-custom-net.
Access the container web1 from test1 using the curl command. 

1. Create a custom network with the default driver.

#docker network create --driver bridge my-custom-net                                       

2. Create Nginx Container with a custom network.

#docker container run -itd --name web1 --network my-custom-net nginx             

3. Create another container with to test Nginx container

 #docker container run -itd --name test1 --network my-custom-net                      pranavdhopey/goinit_hub:curl                                                                           

Note: pranavdhopey/goinit_hub:curl is my own image with a curl package installed on alpine base image.

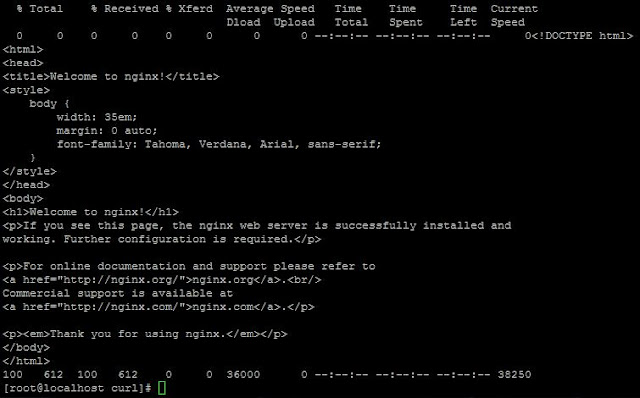
4. Now check whether we are able to access the web page from other container.

#docker container exec test1 curl web1:80                                                        


By above screenshot, we can see that we are able to access web1 from test1 container using name. 


Shell VS Python Examples


1. Use for loops to display the natural numbers from 1 to 50.
## Shell Script ##
for i in {1..50}
do 
   echo $i
done
--------------------------------------
for ((i=1; i<=50; i++))
do 
   echo $i
done

## Python Script ##
for i in range(1,51):
    print(i)

2. Read the input from user and print.
## Shell Script ##
read –p “Enter Your Name : ” name
echo “${name}”

## Python Script ##
name = input(“Enter Your Name : ”)
print(name)

3. Find the largest of three number.
## Shell Script ##
read -p "Enter Num1 : " num1
read -p "Enter Num2 : " num2
read -p "Enter Num3 : " num3

if [ $num1 -gt $num2 ] && [ $num1 -gt $num3 ]
then
    echo "Largest number is ${num1} "
elif [ $num2 -gt $num1 ] && [ $num2 -gt $num3 ]
then
    echo "Largest number is ${num2} "
else
    echo "Largest number is ${num3} "
fi

## Python Script ##
num1 = int(input("Enter Num1 :))
num2 = int(input("Enter Num2 :))
num3 = int(input("Enter Num3 :))

if num1 > num2 and num1 > num3:
        largest = num1
elif num2 > num1 and num2 > num3:
        largest = num2
else:
        largest = num3
print("Largest number is : ", largest)

4. Find the given number is prime or not.
 ## Shell Script ##
read -p "Enter a number: " num
if [ $num -gt 1 ]
then
   for i in `seq 2 $(($num-1))`
   do
      if (($num % $i == 0 ))
      then
        echo "$num is not a prime number"
        exit
      fi
   done
     echo "$num is a prime number"
else
   echo "$num is a not prime number"
fi

## Python Script ##
num = int(input("Any number number : "))
if num > 1:
    for i in range(2,num):
        if (num%2)==0:
          print(num,"is not a prime number")
          break
    else:
       print(num,"is a prime number")
else:
    print(num,"is not a prime number")

5. Find the length of string and specific words from the given string.
## Shell Script ##
str="Hello World, This is Testing!"
length=${#str}
echo "Length of str is $length"
 
echo "Printing the 11 characters starting from 6th position"
echo ${str:6:11}
echo "Printing the 7 characters starting from 21st position"
echo ${str:21:7}
echo "Printing entire string"
echo ${str:0}

## Python Script ##
str = "Hello World, This is Testing!"
print("Lenght of str is ", len(str))
 
print("Printing charachetrs from 6th to 10th position ", str[6:11])
print("Printing charachetrs from 21st to 27th position ", str[21:27])
print("Printing entire string ", str[0:])

6. Use for loops to display the numbers from 0 to 50 incremented by 2.
## Shell Script ##
for i in {0..50..2}
do
   echo $i
done
--------------------------------------
for i in $(seq 0 2 50)
do
   echo $i
done
 
## Python Script ##
for i in range(0,51,2):
    print(i)


Docker Interview Questions: Part 1

Q) What is Docker?
Docker is a containerization platform which packages your application and all its dependencies together in the form of containers so as to ensure that your application works seamlessly in any environment, be it development, test, or production.

Q) What is Docker Container?
Docker containers include the application and all of its dependencies. It shares the kernel with other containers, running as isolated processes in user space on the host operating system. Docker containers are not tied to any specific infrastructure: they run on any computer, on any infrastructure, and in any cloud. Docker containers are basically runtime instances of Docker images.

Q) What is Docker Image?
Docker image is an executable package that includes everything needed to run an application – the code, a runtime, libraries, environment variables and configuration files.  
Docker image is the source of the Docker container. In other words, Docker images are used to create containers. When a user runs a Docker image, an instance of a container is created. These docker images can be deployed to any Docker environment.

Q) What is Docker architecture?
Docker uses a client-server architecture. The Docker client talks to the Docker daemon, which does the heavy lifting of building, running, and distributing your Docker containers. The Docker client and daemon can run on the same system, or you can connect a Docker client to a remote Docker daemon. The Docker client and daemon communicate using a REST API, over UNIX sockets or a network interface.

There are three components in the Docker Engine.
The Docker daemon:
The Docker daemon (dockerd) listens for Docker API requests and manages Docker objects such as images, containers, networks, and volumes. A daemon can also communicate with other daemons to manage Docker services.

The Docker client:
The Docker client (docker) is the primary way that many Docker users interact with Docker. When you use commands such as docker run, the client sends these commands to dockerd, which carries them out. The docker command uses the Docker API. The Docker client can communicate with more than one daemon.

Docker registries:
A Docker registry stores Docker images. Docker Hub is a public registry that anyone can use and Docker is configured to look for images on Docker Hub by default.

Q) What is Docker Hub?
Docker Hub is cloud based registry service that stores container images. It allows us to pull and push docker images to and from Docker Hub. It stores both types of repositories, i.e., pubic repository as well as the private repository.
Docker Hub is central repository for container image discovery, distribution, change management, workflow automation and team collaboration.

Q) What is Docker Compose?
Compose is a tool for defining and running multi-container Docker applications. 
Docker Compose is a YAML file that contains details about the services, networks, and volumes for setting up the Docker application. So, you can use Docker Compose to create separate containers, host them, and get them to communicate with each other. Each container will expose a port for communicating with other containers.

Q) What is Docker Stack?
docker stack is a command that's embedded into the Docker CLI. It lets you manage a cluster of Docker containers through Docker Swarm.

Q) What is Docker Swarm?
Docker Swarm is native clustering for Docker. It turns a pool of Docker hosts into a single, virtual Docker host.

Q) What are the components of Docker Swarm?
1. Services: Service defines a task that needs to be executed on the manager or worker node.
2. Tasks: Tasks are the Docker container that executes the commands you define in service.
3. Manager Node: The manager node has a few responsibilities like accepting commands to create service objects, allocating the IP addresses to the various tasks, and assigning the tasks to the nodes.
4. Worker Node:  It is responsible for checking the tasks assigned and also executing the containers. 

Ref Link: https://intellipaat.com/community/41375/what-are-the-components-of-docker-swarm

Q) The correct order of service creation process in swarm mode? 
Manager Node:
Ø  Docker API: Accepts command from the client and creates service object.
Ø  Orchestrator: Reconciliation loop for service objects and creates tasks.
Ø  Allocator:  Allocates IP address to tasks.
Ø  Scheduler: Assigns nodes to tasks.
Ø  Dispatcher: Checks in on workers.
Worker Node:
Ø  Worker: Connects to the dispatcher to check on assigned tasks.
Ø  Executor: Executes the tasks assigned to the worker node.

Q) What is Dockerfile?
Docker images are built from Dockerfile. A Dockerfile defines all the steps required to create a docker image with your application configured and ready to be run as a container. A Dockerfile is executed by the docker build command.
Docker image itself contains everything from the operating system to dependencies and configuration required to run your application.

Q) Docker restart policies?
i) no: This is the default restart policy.
ii) always: Always restart the container if it stops. If it is manually stopped, it is restarted only when the Docker daemon restarts or the container itself is manually restarted.
iii) on-failure: Restart the container if it exits due to an error(non-zero exit code)
iv) unless-stopped: Similar to always, except that when the container is stopped (manually or otherwise), it is not restarted even after Docker daemon restarts. 


Q) Docker container lifecycle?
1. Create the container.
2. Run the container.
3. Pause the container.
4. Un-Pause the container.
5. Start the container.
6. Stop the container.
7. Restart the Container.
8. Kill the container.
9. Destroy the container.

Q) What are the various states that a Docker container can be in at any given point in time? 
There are six states that a Docker container can be in, at any given point in time. Those states are as given as follows:
Ø  Created
Ø  Restarting
Ø  Running
Ø  Paused
Ø  Exited
Ø  Dead

Ref Link: https://roytuts.com/what-are-the-possible-states-of-docker-container/

Q) What is Containerization?
In the software development process, code deployed on one machine might not work perfectly fine on any other machine because of dependencies. This problem was solved by the containerization concept.
Basically, an application that is being developed and deployed is bundled and wrapped together with all its configuration files and dependencies. This bundle is called a container. Containerization is the process of packaging application code with its required libraries, frameworks, and configuration files so that it can be run efficiently and seamlessly in any environment.  
The containerization environments are Docker and Kubernetes. 

Q) Difference between COPY and ADD command.
COPY command copies files/directories from the host machine to the container’s file system.
ADD command also copies files/directories from the host machine to the container’s file system, other than this it also copies files from URL to destination directory under the container file system. ADD command also copies tar file to destination directory by automatically extracting the content.

Q) Available Docker Network Drivers?
Docker comes with a built-in network drivers are known as Native Network Driver and those are:

1. Bridge
2. Host
3. Macvlan
4. Null
5. Overlay

Q) Difference between CMD and ENTRYPOINT instruction?
CMD instruction allows you to set a default command and default parameters which will be executed when docker is run.
ENTRYPOINT instruction should be used when you need your container to be run as an executable.

Q) Difference between ENV and ARG?
ENV is for future running containers. ARG for building your Docker image.
ENV is mainly meant to provide default values for your future environment variables. Running dockerized applications can access environment variables. It’s a great way to pass configuration values to your project.
ARG values are not available after the image is built. A running container won’t have access to an ARG variable value.

Q) What are the most common instructions in Dockerfile?
Some of the common instructions in Dockerfile are as follows:   
ØFROM: We use FROM to set the base image for subsequent instructions. In every valid Dockerfile, FROM is the first instruction.
ØLABEL: We use LABEL to organize our images as per project, module, licensing etc. We can also use LABEL to help in automation. In LABEL we specify a key-value pair that can be later used for programmatically handling the Dockerfile
ØRUN: We use RUN command to execute any instructions in a new layer on top of the current image. With each RUN command we add something on top of the image and use it in subsequent steps in Dockerfile.
ØCMD: We use CMD command to provide default values of an executing container. In a Dockerfile, if we include multiple CMD commands, then only the last instruction is used.

Q) Container Network Model (CNM).
Docker uses an architecture called Container Network Model (CNM) to manage networking for Docker containers.
1. Sandbox
2. Endpoint
3. Network
4. Driver
5. NetworkController 

Q) Docker Universal Control Plane.

Docker Universal Control Plane (UCP) is the enterprise-grade cluster management solution from Docker which helps you manage your Docker cluster and applications through a single interface.
Universal Control Plane include centralized policy management for all of your container, centralized role-based access control, user management, application cluster management, and the ability to organize your container as a service or stack.
It also includes secure image scanning, continuous monitoring of your image in the registry.

Q) What is Docker Trusted Registry(DTR)?
Docker Trusted Registry is an on-site, on-premise registry for centralized storage for all your container images. DTR is an enterprise-grade image storage solution from Docker. DTR is installed on-prem or in your own public cloud infrastructure. It works with Universal Control Plane. It allows you to securely store your Docker images so that you can easily track and manage your applications. Like UCP it's an easy-to-use web-based application. It has role-based access controls, so it supports multiple users and it allows your company to easily store all of your images on-premises in your own registry.

Q) What are the Control groups?
Docker Engine on Linux also relies on a technology called control groups (cgroups). A cgroup limits an application to a specific set of resources. Control groups allow Docker Engine to share available hardware resources to containers and optionally enforce limits and constraints. For example, you can limit the memory available to a specific container.
what a cgroup does is it provides resource accounting and limiting and it ensures that no containers exhaust the host's resources.

Q) Difference between replicated and global deployment?
For a replicated service, you specify the number of identical tasks you want to run. For example, you decide to deploy a Redis service with five replicas, each serving the same content. A global service is a service that runs one task on every node. There is no pre-specified number of tasks.

Q) Mount options available in docker?
1. Volume mount: it is managed by docker and is stored in a part of the host filesystem (stored at /var/lib/docker/volumes/ in Linux).
2. Bind mount: it may be stored anywhere on the host system.
3. tmpfs: Stored only in a host’s system memory in Linux.

Q) Difference between docker stop and docker kill?
#docker stop <container-id>: will send SIGTERM (terminate) signal and then SIGKILL signal after a grace period of 10 secs to the process running inside the container leading to a gracefull stop. 
#docker kill <container-id>: will send SIGKILL signal to the process running inside the container causing abruptly stop the container.

VPC Creation Using VPC Wizard Scenario 2

Scenario 2: VPC with the Public and Private Subnet

In this scenario, we are going to create VPC with single public subnet using VPC Wizard.

1. Go to VPC Dashboard on AWS Web Console and click on Start VPC Wizard.


2. Choose VPC with public and private subnet and then choose select.


3. Provide the details for creating VPC as follows.

IPv4 CIDR block: 10.0.0.0/16 (Default AWS provide CIDR block as 10.0.0.0/16).

IPv6 CIDR block: No (Default it is selected as NO).

VPC name: Pranav-VPC2 (Provide VPC Name as you like).

Public subnet's IPv4 CIDR: 10.0.1.0/24 (This will provide the public CIDR block range).

Availability Zone: us-east-1a (Select the availability zone as you like or let AWS will decide).

Public subnet name: Public-1a (Provide subnet name).

Private subnet's IPv4 CIDR: 10.0.2.0/24 (This will provide the public CIDR block range).

Availability Zone: us-east-1b (Select the availability zone as you like or let AWS will decide).

Subnet name: Public-1b (Provide subnet name).

Specify the allocation ID for an Elastic IP address in your account, for NAT gateway.

Enable DNS hostnames: Yes (Default it is selected as yes so that instances can be accessed using DNS hostname).

Hardware tenancy: Default 

After providing all the details click on Create VPC. Within few seconds you have VPC created as per your requirement.


4. Enable Auto assign Public IP for public subnet.

By default the subnet which is created will have “Auto assign public IP” attribute set to No, This is because the subnet is non default subnet created using VPC Wizard.


In order to access the instances launched into the Public Subnet must have public IP assigned to it. To enable “Auto assign public IP” attribute we need to modify the auto-assign IP settings.

Under VPC dashboard, in navigation pane choose Subnets.

Select your subnet and choose Subnet Actions, Modify auto-assign IP settings.
Click on check box to select and then press save.


Important Points:
1. In this scenario, after creating VPC using VPC wizard, AWS will create two subnets, public and private, Internet Gateway (IGW) that allows instances in public subnet to communicate with the internet and other AWS services and NAT Gateway with its own Elastic IP address allows the instances in private subnet to connect to the internet.
2. It creates two route tables:
  One is the Main Route table associated with private subnet which has local route that allows the instances to communicate within VPC and second route allows instances in private subnet to connect to the internet through NAT Gateway.
  Second is Custom (No Main) associated with public subnet which have two routes added to it. One which allows instances to communicate within VPC and other one has route that allows instances to communicate with internet through internet gateway (IGW).
3. Public subnet created using VPC wizard is the non-default subnet, having “Auto-assign Public IP” and “Auto-assign IPv6 address” attributes set to NO (false).

VPC Creation Using VPC Wizard Scenario 1

VPC with a Single Public Subnet

Under VPC Wizard we have 4 options available to us and those are:
1. VPC with a Single Public Subnet
2. VPC with Public and Private Subnets
3. VPC with Public and Private Subnets and Hardware VPN Access
4. VPC with a Private Subnet Only and Hardware VPN Access

In this scenario, we are going to create VPC with single public subnet using VPC Wizard.

1. Go to VPC Dashboard on AWS Web Console and click on Start VPC Wizard.


2. Choose VPC with a single public subnet and then choose select.


3. Provide the details for creating VPC as follows

IPv4 CIDR block: 192.168.0.0/16 (Default AWS provide CIDR block as 10.0.0.0/16).

IPv6 CIDR block: No (Default it is selected as NO).


VPC name: Pranav-VPC1 (Provide VPC Name as you like).

Public subnet's IPv4 CIDR: 192.168.1.0/24 (This will provide the public CIDR block range).

Availability Zone: us-east-1a (Select the availability zone as you like or let AWS will decide).

Subnet name: Pranav-VPC1-Public Sub (Provide subnet name).

Enable DNS hostnames: Yes (Default it is selected as yes so that instances can be accessed using DNS hostname).

Hardware tenancy: Default


After providing all the details click on Create VPC. Within few seconds you have VPC created as per your requirement.


4. Enable Auto assign Public IP.
By default the subnet which is created will have “Auto assign public IP” attribute set to NO, This is because the subnet is non-default subnet created using VPC Wizard.


In order to access the instances launched into the Public Subnet must have public IP assigned to it. To enable “Auto assign public IP” attribute we need to modify the auto-assign IP settings.
Under VPC dashboard, in navigation pane choose Subnets.
Select your subnet and choose Subnet Actions, Modify auto-assign IP settings.
Click on the check box to select and then press save.


Important Points:
1. In this scenario, after creating VPC using VPC wizard, AWS will create Internet Gateway (IGW) that allows instances in public subnet to communicate with the internet and other AWS services.
2. It creates two route tables:
  One is the Main Route table which has a local route that allows the instances to communicate within VPC and it has no subnet associated with it.
  Second is Custom (No Main) which have two routes added to it. One which allows instances to communicate within VPC and other one has a route that allows instances to communicate with internet through internet gateway (IGW).
 Custom (No Main) route table has one subnet associated with it.
3. Subnet created using VPC wizard is the non-default subnet, having “Auto-assign Public IP” and “Auto-assign IPv6 address” attributes set to NO (false).