Scenario 2: VPC with the Public and
Private Subnet
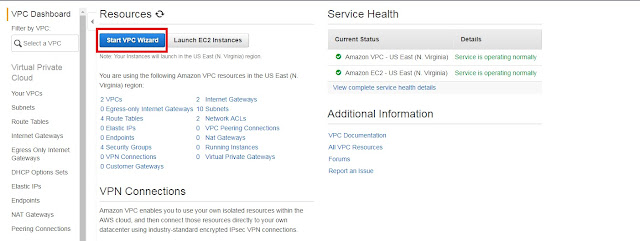
In this scenario, we are going to create VPC with single public subnet using VPC Wizard.
2. Choose VPC
with public and private subnet and then choose select.
3. Provide
the details for creating VPC as follows.
IPv4 CIDR block: 10.0.0.0/16 (Default AWS provide CIDR
block as 10.0.0.0/16).
IPv6 CIDR block: No (Default it is selected as NO).
VPC name: Pranav-VPC2 (Provide VPC Name as you
like).
Public subnet's IPv4 CIDR: 10.0.1.0/24 (This will provide the
public CIDR block range).
Availability Zone: us-east-1a (Select the availability
zone as you like or let AWS will decide).
Public subnet name: Public-1a (Provide subnet name).
Private subnet's IPv4 CIDR: 10.0.2.0/24 (This will provide the
public CIDR block range).
Availability Zone: us-east-1b (Select the availability
zone as you like or let AWS will decide).
Subnet name: Public-1b (Provide subnet name).
Specify the allocation ID for an Elastic IP address
in your account, for NAT gateway.
Enable DNS hostnames: Yes (Default it is selected as yes so
that instances can be accessed using DNS hostname).
Hardware tenancy: Default
After
providing all the details click on Create
VPC. Within few seconds you have VPC created as per your requirement.
4. Enable
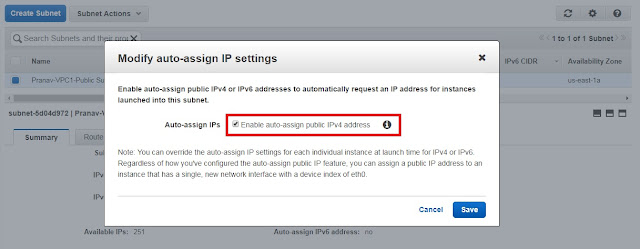
Auto assign Public IP for public subnet.
By default
the subnet which is created will have “Auto assign public IP” attribute set to
No, This is because the subnet is non default subnet created using VPC Wizard.
In order to
access the instances launched into the Public Subnet must have public IP assigned
to it. To enable “Auto assign public IP” attribute we need to modify the
auto-assign IP settings.
Under VPC
dashboard, in navigation pane choose Subnets.
Select your
subnet and choose Subnet Actions, Modify auto-assign IP settings.
Click on
check box to select and then press save.
Important
Points:
1. In this
scenario, after creating VPC using VPC wizard, AWS will create two subnets,
public and private, Internet Gateway (IGW) that allows instances in public
subnet to communicate with the internet and other AWS services and NAT Gateway
with its own Elastic IP address allows the instances in private subnet to connect
to the internet.
2. It creates
two route tables:
One is the Main Route table associated with private subnet which has local
route that allows the instances to communicate within VPC and second route
allows instances in private subnet to connect to the internet through NAT
Gateway.
Second is Custom (No Main) associated with public subnet which have two
routes added to it. One which allows instances to communicate within VPC and
other one has route that allows instances to communicate with internet through
internet gateway (IGW).
3. Public subnet
created using VPC wizard is the non-default subnet, having “Auto-assign Public
IP” and “Auto-assign IPv6 address” attributes set to NO (false).


