VPC Creation Using VPC Wizard Scenario 2

Scenario 2: VPC with the Public and Private Subnet

In this scenario, we are going to create VPC with single public subnet using VPC Wizard.

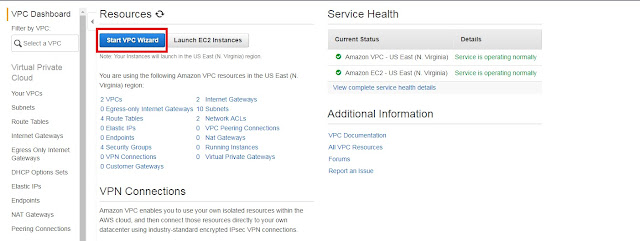
1. Go to VPC Dashboard on AWS Web Console and click on Start VPC Wizard.


2. Choose VPC with public and private subnet and then choose select.


3. Provide the details for creating VPC as follows.

IPv4 CIDR block: 10.0.0.0/16 (Default AWS provide CIDR block as 10.0.0.0/16).

IPv6 CIDR block: No (Default it is selected as NO).

VPC name: Pranav-VPC2 (Provide VPC Name as you like).

Public subnet's IPv4 CIDR: 10.0.1.0/24 (This will provide the public CIDR block range).

Availability Zone: us-east-1a (Select the availability zone as you like or let AWS will decide).

Public subnet name: Public-1a (Provide subnet name).

Private subnet's IPv4 CIDR: 10.0.2.0/24 (This will provide the public CIDR block range).

Availability Zone: us-east-1b (Select the availability zone as you like or let AWS will decide).

Subnet name: Public-1b (Provide subnet name).

Specify the allocation ID for an Elastic IP address in your account, for NAT gateway.

Enable DNS hostnames: Yes (Default it is selected as yes so that instances can be accessed using DNS hostname).

Hardware tenancy: Default 

After providing all the details click on Create VPC. Within few seconds you have VPC created as per your requirement.


4. Enable Auto assign Public IP for public subnet.

By default the subnet which is created will have “Auto assign public IP” attribute set to No, This is because the subnet is non default subnet created using VPC Wizard.


In order to access the instances launched into the Public Subnet must have public IP assigned to it. To enable “Auto assign public IP” attribute we need to modify the auto-assign IP settings.

Under VPC dashboard, in navigation pane choose Subnets.

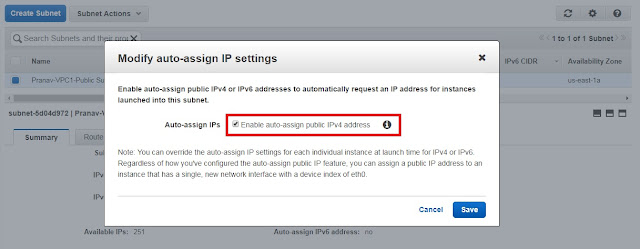
Select your subnet and choose Subnet Actions, Modify auto-assign IP settings.
Click on check box to select and then press save.


Important Points:
1. In this scenario, after creating VPC using VPC wizard, AWS will create two subnets, public and private, Internet Gateway (IGW) that allows instances in public subnet to communicate with the internet and other AWS services and NAT Gateway with its own Elastic IP address allows the instances in private subnet to connect to the internet.
2. It creates two route tables:
  One is the Main Route table associated with private subnet which has local route that allows the instances to communicate within VPC and second route allows instances in private subnet to connect to the internet through NAT Gateway.
  Second is Custom (No Main) associated with public subnet which have two routes added to it. One which allows instances to communicate within VPC and other one has route that allows instances to communicate with internet through internet gateway (IGW).
3. Public subnet created using VPC wizard is the non-default subnet, having “Auto-assign Public IP” and “Auto-assign IPv6 address” attributes set to NO (false).

VPC Creation Using VPC Wizard Scenario 1

VPC with a Single Public Subnet

Under VPC Wizard we have 4 options available to us and those are:
1. VPC with a Single Public Subnet
2. VPC with Public and Private Subnets
3. VPC with Public and Private Subnets and Hardware VPN Access
4. VPC with a Private Subnet Only and Hardware VPN Access

In this scenario, we are going to create VPC with single public subnet using VPC Wizard.

1. Go to VPC Dashboard on AWS Web Console and click on Start VPC Wizard.


2. Choose VPC with a single public subnet and then choose select.


3. Provide the details for creating VPC as follows

IPv4 CIDR block: 192.168.0.0/16 (Default AWS provide CIDR block as 10.0.0.0/16).

IPv6 CIDR block: No (Default it is selected as NO).


VPC name: Pranav-VPC1 (Provide VPC Name as you like).

Public subnet's IPv4 CIDR: 192.168.1.0/24 (This will provide the public CIDR block range).

Availability Zone: us-east-1a (Select the availability zone as you like or let AWS will decide).

Subnet name: Pranav-VPC1-Public Sub (Provide subnet name).

Enable DNS hostnames: Yes (Default it is selected as yes so that instances can be accessed using DNS hostname).

Hardware tenancy: Default


After providing all the details click on Create VPC. Within few seconds you have VPC created as per your requirement.


4. Enable Auto assign Public IP.
By default the subnet which is created will have “Auto assign public IP” attribute set to NO, This is because the subnet is non-default subnet created using VPC Wizard.


In order to access the instances launched into the Public Subnet must have public IP assigned to it. To enable “Auto assign public IP” attribute we need to modify the auto-assign IP settings.
Under VPC dashboard, in navigation pane choose Subnets.
Select your subnet and choose Subnet Actions, Modify auto-assign IP settings.
Click on the check box to select and then press save.


Important Points:
1. In this scenario, after creating VPC using VPC wizard, AWS will create Internet Gateway (IGW) that allows instances in public subnet to communicate with the internet and other AWS services.
2. It creates two route tables:
  One is the Main Route table which has a local route that allows the instances to communicate within VPC and it has no subnet associated with it.
  Second is Custom (No Main) which have two routes added to it. One which allows instances to communicate within VPC and other one has a route that allows instances to communicate with internet through internet gateway (IGW).
 Custom (No Main) route table has one subnet associated with it.
3. Subnet created using VPC wizard is the non-default subnet, having “Auto-assign Public IP” and “Auto-assign IPv6 address” attributes set to NO (false).

Gentoo Installation Step by Step

1. Boot the system with Gentoo-minimal ISO CD.

Download Gentoo ISO (Minimal) from https://www.gentoo.org/downloads/ site.

Burn the CD and boot the system.

2. Determine interface name using ifconfig command.

In my case, it is “eno16777728”. Configure the network interface. IP will change according to your network.

# ifconfig eth0 192.168.1.109 broadcast 192.168.1.255 netmask 255.255.255.0 up
# route add default gw 192.168.1.1

Add the following entry in resolve.conf file.

# nano /etc/resolv.conf
nameserver 192.168.1.1
nameserver 8.8.8.8


3. Start sshd service.

To do the installation over ssh, start the sshd service and provide the root password.

#/etc/init.d/sshd start
# passwd


4. Create partitions as per the requirement.
In my case, I am going to create following partitions as on my virtual machine I am having only 20 GB of /dev/sda disk size.
Partitions and its size will vary depending on your system.

1. /boot -- 500M
2. /          -- 18G
3. swap   --  1024M


5. Formatting partitions.

Now Format created partitions with the supported filesystem(here formatted with ext4 filesystem).

#mkfs.ext4 /dev/sda1


#mkfs.ext4 /dev/sda2


Activate the swap partition.

#mkswap /dev/sda3
#swapon /dev/sda3


6. Setting date.

Check date and time of the system. In case of time desynchronization use following command to set time.

#date MMDDhhmmYYYY

7. Mounting root partition.

Mount the root and boot partition under /mnt/gentoo.

#mount /dev/sda2 /mnt/gentoo
#mkdir /mnt/gentoo/boot
#mount /dev/sda1 /mnt/gentoo/boot


8. Downloading stage3 tarball.

Download stage3 tar from https://www.gentoo.org/downloads/
Once downloaded dump it into /mnt/gentoo. 


Now unpack the tar ball under /mnt/gentoo directory.

#tar xvjpf stage3-*.tar.bz2 --xattrs --numeric-owner
After extracting stage3 tar ball it will look like in below image.


9. Copy dns info.

Before entering the new environment copy the DNS information in /etc/resolv.conf.

#cp -L /etc/resolv.conf /mnt/gentoo/etc/

10. Mounting the necessary filesystems.

Mount the /proc, /sys and /dev directories to /mnt/gentoo installation system path, as this contains all the important hardware information of your system gathered by the kernel when the live CD is booted.

#mount -t proc /proc /mnt/gentoo/proc
#mount --rbind /sys /mnt/gentoo/sys

#mount --rbind /dev /mnt/gentoo/dev


11. Entering the new environment

Now go to the chroot environment, load previous system settings provided by /etc/profile file and change $PS1 Command Prompt.

#chroot /mnt/gentoo /bin/bash
#source /etc/profile
#export PS1="(chroot) $PS1"


12. Install ebuild repository snapshot from the web.

#emerge-webrsync


13. Choosing the right profile.

After Portage finishes synchronization select a profile for your future system destination.

#eselect profile list

I am going to select default profile i.e. 1

#eselect profile set 1

14. Setting time zone.
Next, configure your system Time Zone.

# ls /usr/share/zoneinfo
# cp /usr/share/zoneinfo/Asia/Kolkata /etc/localtime
# echo " Asia/Kolkata " > /etc/timezone


15. Configuring locales.

Configure Locales by uncommenting your preferred language from /etc/locale.gen file using the following series of commands.

#nano  /etc/locale.gen

Uncomment your system locale, I have uncommented below one.

en_US.UTF-8 UTF-8

run locale-gen command to generate all the locale specified in /etc/locale.gen

#locale-gen


Now reload the environment.

#env-update && source /etc/profile


16. Installing the sources.

#emerge --ask sys-kernel/gentoo-sources

17. Installing pciutils.
#emerge --ask sys-apps/pciutils


18. Configuring Linux kernel.

Go to the kernel source directory and execute make menuconfig.

#cd /usr/src/linux
#make menuconfig


Now configuration screen will appear on the terminal. The Linux kernel configuration has many, many sections. Select/Verify appropriate modules has been selected or not. Select if not and finally save the configuration.


Exit the configuration and start the compilation process

#make && make modules_install
#make install


Copy the kernel image file to the boot directory.

#cp arch/x86_64/boot/bzImage /boot/kernel-4.12.5-gentoo


19. Open /etc/fstab file and add the following content.

Next step is to configure fstab file to automatically mount system partitions during the boot process.


20. Installing system bootloader.

To make Gentoo start after reboot install GRUB Boot Loader on your first hard disk and generate its configuration file by running the following commands.

#emerge sys-boot/grub


#grub-install /dev/sda
#grub-mkconfig -o /boot/grub/grub.cfg


21. Set the hostname.


Set a hostname for your system by editing /etc/conf.d/hostname file.  


22. Install DHCP client.

Configure your network settings with DHCP install dhcpcd Client.
rc-update will add it in system startup process.

#emerge net-misc/dhcpcd

#rc-update add dhcpcd default


23. Install other important packages.

#emerge virtual/ssh
#emerge syslog-ng
#emerge cronie
#emerge mlocate
#rc-update add sshd default
#rc-update add syslog-ng default
#rc-update add cronie default
#emerge sudo
#emerge net-misc/netkit-telnetd
#emerge tcpdump

24. Provide root password in chroot environment.

#passwd


25. Rebooting the system

Exit the chrooted environment and unmount all mounted partitions.

#exit
#cd
#umount -l /mnt/gentoo/dev{/shm,/pts,}
#umount -R /mnt/gentoo
#reboot


Reference Link: https://wiki.gentoo.org/ and https://www.tecmint.com/

Find out Memory Usage of each process in Linux

In this post, I have listed out some commands to show the Memory Usage of each process running.
Hope this will help you out to know memory utilization per process.
Also shared reference links where I found this commands.


1. Show the processes memory in megabytes and the process path.
Reference Link: https://superuser.com/

#ps aux  | awk '{print $6/1024 " MB\t\t" $11}'  | sort -n

2. Total memory consumption by the current user.
Reference Link: https://superuser.com/

#echo "------------------------------------" && mem=0 && while read -r rss comm ; do mbs=$((rss/1024)); mem=$((mbs + mem)); echo $mbs"MB - $comm"; done <<< "$(ps -u $USER -wo rss=,comm= --sort -rss)" && echo "------------------------------------" && echo $mem"MB: Memory used by user '$USER'"

All user processes sorted by the highest memory usage in MB.

#ps -u $USER -wo rss=,comm= --sort -rss | while read -r rss comm ; do echo $((rss/1024))"MB -" $comm; done


3. Display Processes Sorted By Memory Usage in Linux.
Reference Link:https://www.shellhacks.com

#ps axo rss,comm,pid \
| awk '{ proc_list[$2]++; proc_list[$2 "," 1] += $1; } \
END { for (proc in proc_list) { printf("%d\t%s\n", \
proc_list[proc "," 1],proc); }}' | sort -n | tail -n 10 | sort -rn \
| awk '{$1/=1024;printf "%.0fMB\t",$1}{print $2}'

4. Top 10 processes sorted by memory usage.
Reference Link: https://www.linuxquestions.org/

#ps -eo rss,pid,user,comm | sort -rn | head -10 | awk '{ hr[1024**2]="GB"; hr[1024]="MB";
 for (x=1024**3; x>=1024; x/=1024) {
 if ($1>=x) { printf ("%-6.2f %s ", $1/x, hr[x]); break }
 } } { printf ("%-6s %-10s ", $2, $3) }
 { for ( x=4 ; x<=NF ; x++ ) { printf ("%s ",$x) } print ("\n") }'

Add Linux Host to Nagios Monitoring Server (Complete Script)

In this post, I have created a script which involves all the steps which we perform while adding Linux host in Nagios monitoring server.

Download script here: plugin-nrpe-install script

#!/bin/bash

Path1=/opt/softwares/nagios-plugins-2.1.1  ## this path may varies with the current veriosn
Path2=/opt/softwares/nrpe-2.15                   ##  of plugin and nrpe.

echo -e "\e[1;32mNagios Client Installation...\e[0m"

Packages="wget gcc glibc glibc-common gd gd-devel make net-snmp openssl-devel"
for pkg in $Packages; do

if [ -z $(rpm -qa $pkg) ];
then
echo -e "\e[1;31m$pkg not installed\e[0m"
echo "$pkg" >> /tmp/notinstalled.txt
else
echo -e "\e[1;32m$pkg installed\e[0m"
fi
done
##############################################
for i in `cat /tmp/notinstalled.txt`;
   do
   /usr/bin/yum install $i -y
#    echo "$i is not installed."
#   echo -e "\e[1;32mAll the Packages are installed\e[0m"
   >/tmp/notinstalled.txt
done
##############################################
USERID="nagios"
ID='/usr/bin/id'
/bin/egrep  -i "^${USERID}:" /etc/passwd
if [ $? -eq 0 ]; then
   echo -e "\e[1;32mUser $USERID exists in /etc/passwd \e[0m"
   echo -e "\e[1;32mNagios ID is $ID nagios \e[0m"
else
   echo -e "\e[1;32mUser $USERID does not exists in /etc/passwd \e[0m"
   echo  -e "\e[1;32mAdding user Nagios \e[0m"
   useradd nagios
   echo "nagios123" | passwd nagios --stdin
fi
##########################################
echo -e "\e[1;32mDownloading the nagios and nrpe plugins\e[0m"
mkdir /opt/softwares/
cd /opt/softwares/
/usr/bin/wget "http://www.nagios-plugins.org/download/nagios-plugins-2.1.1.tar.gz" && tar xf nagios-plugins-2.1.1.tar.gz
/usr/bin/wget --no-check-certificate "https://sourceforge.net/projects/nagios/files/nrpe-2.x/nrpe-2.15/nrpe-2.15.tar.gz" && tar xf nrpe-2.15.tar.gz
################################################
if [ ! -d "/usr/local/nagios" ]
then
    echo -e "\e[1;31Directory "/usr/local/nagios" does not exists.\e[0m"
    echo -e "\e[1;32Instaling nagios plugins\e[0m"
    cd $Path1
    ./configure
    make
    make install
    /bin/chown nagios.nagios /usr/local/nagios
    /bin/chown -R nagios.nagios /usr/local/nagios/libexec
    sleep 5
    echo -e "\e[1;32mInstalling xinetd package\e[0m"
    yum install xinetd -y
###########################################
    echo -e "\e[1;32mInstalling nrpe plugin\e[0m"
    cd $Path2
    ./configure
    make all
    make install-plugin
    make install-daemon
    make install-daemon-config
    make install-xinetd
    sleep 5
/bin/sed -i 's/127.0.0.1/127.0.0.1 localhost 192.168.1.207/g' /etc/xinetd.d/nrpe
 ## Higlighted IP will be replaced with your Nagios server IP      
/bin/echo "nrpe            5666/tcp                #NRPE" >> /etc/services

    service xinetd start
    chkconfig xinetd on
/bin/netstat -tlpn | grep xinetd
/usr/local/nagios/libexec/check_nrpe -H localhost
/bin/echo -e "\e[1;32mNAGIOS CLIENT SUCCESSFULLY INSTALLED\e[0m"
else
    echo -e "\e[1;32mDirectory /usr/local/nagios exists.\e[0m"
fi


Refernce Link: Tecmint

Any Changes/Suggestions are appreciated.

Managing user's in Linux using script

1. Simple Script to add multiple users in one go.

#!/bin/bash
filename="userslist.txt"  #< contains list of user's 
while read -r username
do
   name=$username
   echo "User created : " $username
   useradd $username
done < $filename

2. Simple script to provide a password to the list of user’s in one go.

#!/bin/bash
filename="userslist.txt" 
password="redhat"    #< provide password of your choice
while read -r username
do 
  name=$username
  echo "password provided for user :" $username
  echo "$password" | passwd $username --stdin  
done < $filename

3. Simple script to change the shell of the bulk of user’s in one go.

#!/bin/bash
filename="userslist.txt"  #< contains list of user's whose shell going to change
while read -r username
do 
  name=$username
  echo "changing shell for user :" $username
  chsh -/sbin/nologin $username   #< provide the shell you want to change to.
done < $filename


Copy directory structure from one location to another without files

Suppose that I have a directory with name xyz under /opt and I want to copy same directory structure (without files under it) to /mnt with directory name pqr.

Following is the directory structure containing sub-directories and files.

/opt/xyz/
├── dir1
│   ├── f1
│   │   └── file2
│   └── file1
├── dir2
│   └── f2
│       ├── f3
│       └── file3
└── dir3
    └── f4
        ├── f5
        │   └── file5
        └── file4

Command is:

#rsync -a --include '*/' --exclude '*' /opt/xyz/ /mnt/pqr
or
#cd /opt/xyz && find . -type d -exec mkdir -p /mnt/pqr/{} \;

After executing one of the above command we will get same directory structure without files as below.

/mnt/pqr/
├── dir1
│   └── f1
├── dir2
│   └── f2
│       └── f3
└── dir3
    └── f4
        └── f5

Reference Link: how to copy the directory structure without the files in linux


Useful Commands

1. To get IP Address of Machine.

#ifconfig eth0| grep "inet addr:"|cut -c '21-35'
192.168.1.207 

# ifconfig eth0| grep "inet addr:"|awk -F ":" '{print $2}'|cut -d " " -f 1
192.168.1.207

# ifconfig eth0 |grep "inet addr:"|cut -d: -f2|awk '{print $1}'
192.168.1.207


2. To get Hardware (MAC) address of Ethernet Device.

#ifconfig eth0| grep "HWaddr"|cut -c '39-55'
00:0C:29:85:C9:E3

#ifconfig eth0| grep "HWaddr"|awk -F " "  '{print $5}'
00:0C:29:85:C9:E3


3. To get load average at 1min, 5min and 15min.

# echo "Load1Min: `uptime |awk -F "load average:" '{print $2}'|cut -d, -f1|sed "s/ //g"`"
Load1min: 5.01

# echo "Load5Min: `uptime |awk -F "load average:" '{print $2}'|cut -d, -f2|sed "s/ //g"`"
Load1min: 2.21

# echo "Load15Min: `uptime |awk -F "load average:" '{print $2}'|cut -d, -f3|sed "s/ //g"`"
Load1min: 1.01

4. To get Memory usage in readable format.

#free -tom | awk '/Total:/ {print "Total memory: "$2" MB\nUsed memory: "$3" MB\nFree memory: "$4" MB"}'

Total Memory: 1503 MB
Used Memory: 2 MB
Free Memory: 1501 MB